|
Top Ten Tips for FrontPage 2002
Courtesy of Microsoft Corporation
On June
30, 2001, Microsoft will post a massive list of tips for FrontPage
2002 to the Office XP Web site, but we've got an exclusive peek at
the top ten tips from that list now. Enjoy!
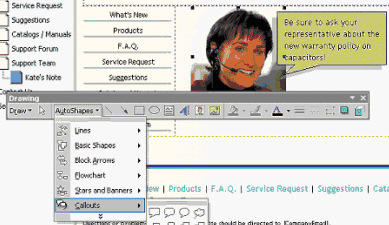
#4. Working with AutoShapes: Callouts
& Drop Shadows
Microsoft FrontPage• version 2002
provides PowerPoint-like drawing tools including AutoShapes and
Shadow Style to create great effects for your web site. With the
auto-shape •Callouts•, you can put dialog balloons together with
photos to add interest to your pages. FrontPage makes it easy. To
make a text balloon or •callout• like the one in the picture below,
select the Drawing icon from the main toolbar to start a new drawing
then-
- In Page view, click on AutoShapes, then
Callouts and select a choice.
- Place your cursor in the new drawing canvas on
your page and click to create your callout shape.
- Click on the callout shape to select it, then
click the Fill Color (paint bucket) icon in the Drawing Toolbar
and select the color you want to fill the shape with.
- Reselect your callout shape, click the Shadow
Style icon on the Drawing Toolbar and select a drop shadow choice.
- Reselect your callout shape and type or paste
text.
More information
For more
information about using the PowerPoint-like Drawing Tools, see
Microsoft FrontPage 2002 Help.
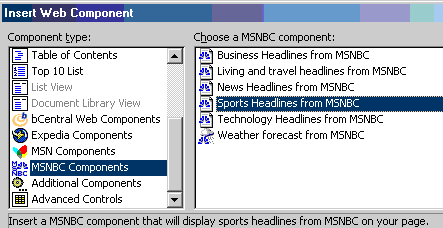
#6. Add Syndicated Content to Your Web from
MSNBC
Add exciting sports content to your Web site from
MSNBC•. By inserting MSNBC Components included in Microsoft
FrontPage• version 2002, your Web content is updated daily by MSNBC.
Now you can have the latest sports content without having to
continually update your site.
To add sports content to your Web site from MSNBC, open a new or
existing page in FrontPage 2002 and do the following:
- In Page view, select Web Component from the Insert menu.
- Under Component Type: scroll down to MSNBC Components.
- Select MSNBC Components.
- Under Choose a MSNBC component: select Sports Headlines from
MSNBC.
- Click Finish.
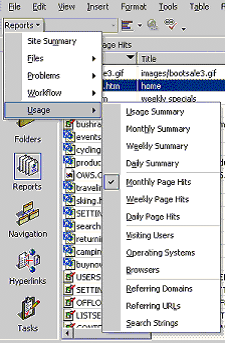
#7. Track How Visitors Access and Use Your Web Site with
Usage Analysis Reports
Microsoft FrontPage• version 2002
features usage analysis reports that show how your Web site is being
used. With these reports, you can determine what pages in your web
site are most popular. You can also learn about how visitors use
your Web site, where they come from and what Web browsers they are
using.
There are more than a dozen different usage analysis reports you
can choose from to help you improve your Web site•s navigation and
better understand your visitors• interests. Half of these reports
provide usage summaries of the visits to your Web site and number of
hits on individual pages on your Web site by month, week, or day.
The other reports are as follows:
- Visiting Users: number of unique site visitors using your Web
site.
- Operating Systems: summary of the operating systems used by
your Web site visitors.
- Browsers: list of the browsers used by your Web site
visitors.
- Referring Domains: list of the most frequent referring domains
to your Web site.
- Referring URLs: list of the most frequent referring URLs to
your Web site.
- Search Strings: list of the most frequent search terms used to
find your web site.
All of these usage analysis reports can be filtered to see just
the information that you want and can be exported to HTML or
Microsoft Excel.
Note: This feature is only available on Web
sites published to Web servers running SharePoint• Team Services
from Microsoft or Microsoft FrontPage• 2002 Server Extensions.
More information
For more information about
using Usage Analysis Reports, see Setting Up Usage Analysis in
FrontPage 2002 or Microsoft FrontPage 2002 Help.
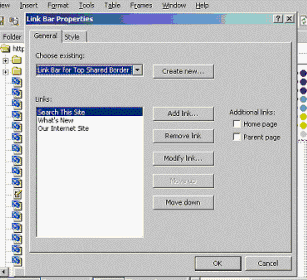
#9. Build Custom Link Bars to Navigate to Pages On or Off
Your Site
In Microsoft FrontPage• version 2002, Link
Bars can be applied site-wide or created ad-hoc and applied anywhere
in your web. You can also use them as •back• and •next• links to
navigate your web pages in a sequence, or include only one link to
quickly make a button. You can even insert Link Bars into pages on
your site with Microsoft Word• 2002.
To add a link bar to a page or your entire Web site, open a new
or existing page in FrontPage 2002 and do the following:
- In Page view, select Web Component from the Insert menu.
- Under Component Type: select Link Bars.
- Under Choose a bar type: select a bar type.
- Select Next and let the wizard walk you through finishing the
Link Bar.
- Click Finish.
- In Link Bar Properties, enter a name for your new Link Bar in
Create New Link Bar and click OK.
- Under Links, enter your custom links by clicking on Add link.
- Complete your link list and click OK to close Link Bar
Properties.
Tip: If a theme has been applied to your web
site, button link bars will use fonts, colors, and other style
elements from the theme.
More information
For more information about
Building Custom Link Bars, see Microsoft FrontPage 2002 Help.
#10. Insert a Top 10 List Linking to Your Most Popular
Pages
Using Microsoft FrontPage• version 2002, you can
quickly insert Top 10 Lists that link to the Top 10 most frequented
pages on your site. Create lists by number of visited pages,
referring domains, referring URLs, search strings, visiting users,
and more. These lists are automatically refreshed when the user
comes to the page. Use the Top 10 List on Internet or intranet
sites.
To add a Top 10 List to a page on your Web site, open a new or
existing page in FrontPage 2002 and do the following:
- In Page view, select Web Component from the Insert menu.
- Under Component Type: select Top 10 List.
- Under Choose a usage list: select a usage list.
- Select Next and let the wizard walk you through finishing the
Link Bar.
- Click Finish.
- In Top 10 List Properties, enter a name for your new usage
list in Title Text: box.
- Under List Style, select a list style and click OK to close
Top 10 List Properties.
Tip: To see list usage data, you must save and
publish this page to a web on a server that supports the Microsoft
FrontPage• version 2002 Server Extensions. Note: If no data appears
in your list, check to see if Usage Analysis is enabled. To find out
more about Usage Analysis see, •Setting Up Usage Analysis in
FrontPage 2002•.
More information
For more information about
inserting a Top Ten List, see Microsoft FrontPage 2002 Help.
#13. Remotely Administer a Web Site based on SharePoint Team
Services
You can remotely administer a SharePoint team
Web site from your browser. Using Microsoft FrontPage• version 2002
and SharePoint• Team Services, it is easy to set up remote
administration by adding a user account with Administrator role
permissions. The Administrator role is a collection of rights that
allow a user to modify all Web site content as well as manage site
settings and accounts. With this user role, a SharePoint team Web
site member can then browse to the Web site and perform
administrative tasks remotely.
To add a user account with Administrator role permissions, open a
SharePoint team Web site with FrontPage 2002 and edit it directly on
the server as follows:
- On the Tools menu, point to Server, and then click
Administration Home.
- On the Site Administration page, under Users and roles, click
Manage users.
- Click Add a user.
- In the User area, click Add a new user with the following
information, and then type the user name and password for the new
user account.
- In the User Role area, select the Administrator role for the
new account.
- Click Add User.
- To remotely administer your SharePoint Team Services Web site,
open a browser and go to the Web site.
- Click on Site Settings on the home page.
Tip: To add a user account, your account must
already have the Administrator role. You may need to check with your
Internet service provider (ISP) or web server administrator to set
up your initial permissions.
More information
For more information about
managing users and user roles, see Microsoft SharePoint Team
Services 2002 Help.
#22. Use the Enhanced Publishing Feature to Drag and Drop
Files Wherever You Want
The new Enhanced Publishing
Dialog in Microsoft FrontPage• version 2002 makes publishing simpler
by allowing you to see both the pages and files on the source Web
and the pages and files on the destination web at the same time.
Now, you can easily drag, drop, or delete files in either location.
To use the Enhanced Publishing Dialog, open a new or existing Web
in FrontPage 2002 and do the following:
- From the File menu, click Publish Web.
- Under Enter publish destination:, enter a URL (see Note:) or
click Browse to select a destination Web.
- In the Publish Web dialog, click the Show>> button to
show the contents of the server you•re publishing to.
- Click and drag files from the source to the destination, or
you can click Publish to publish all new or changed pages.
Tip: Type the destination Web URL in the form-
http://servername/ directory (where servername is the name of the
server you want to publish to, and directory is the directory you
want it placed in).
More information
For more information about
publishing your Web, see Microsoft FrontPage 2002 Help.
#38. Change a SharePoint team Web site Logo Using FrontPage
2002
One of the best things about SharePoint• Team
Services-based web sites is that it is fully customizable with
Microsoft FrontPage• version 2002. Just open the Web site in
FrontPage 2002, and use any of the features and functionality
available in FrontPage to change your SharePoint Team Services-based
Web site. You can easily add your own logos or text, customize lists
in the web by changing what fields should be shown or how the list
data is displayed, and even apply Themes created and customized in
FrontPage to your SharePoint Team Services-basedWeb site.
To replace the SharePoint Team Services logo on the home page
with your own logo in SharePoint Team Services-based Web site, edit
it directly on the server as follows:
- From the File menu, select Open Web.
- Type in the URL for your SharePoint team Web site
(http://your_SharePoint_team_Web_site_computer•s_name/) next to
Web name: and click Open.
- In Page view, Double-click on Default.htm to start editing the
home page.
- To replace the logo with a new graphic, right-click on the
large logo on the right side of the page and select Cut from the
shortcut menu.
- From the Insert menu, select Picture and click From File•.
- In the Picture dialog, browse to the image you want to use,
select it, click the Insert button, and save the page.
- In Save Embedded Files, select options for how and where you
want to save the new logo image.
- Click OK again to save the image and in the File menu, click
Preview in Browser to view your new logo in the SharePoint Team
Services-based Web site.
More information
For more information about
working with SharePoint team Web sites, see Microsoft FrontPage 2002
Help.
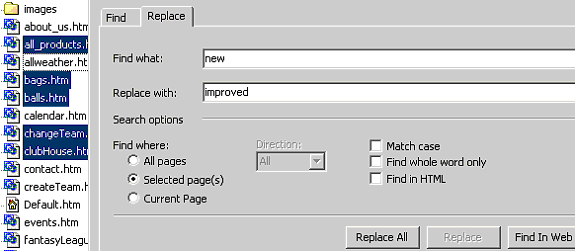
#46. Using Find and Replace Enhancements
Find
and Replace has been enhanced in Microsoft FrontPage• version 2002,
with a new streamlined user interface. You can still search all the
files in your web without opening each individual page to quickly
find and replace content or even HTML. Now you can search multiple
files, selecting only the ones you want to look at. You can also tab
between Find and Replace.
To use the enhanced Find and Replace in a page or across your
entire Web site, open a new or existing page or Web site in
FrontPage 2002 and do the following:
- From the Edit menu, select Find or Replace.
- In Find where:, select where to search by clicking Current
page, Selected page(s) or All Pages
- To find and replace content, click the Replace tab, enter your
text in Find what:, and Replace with: and click Replace All or
Replace.
Tip: To search Selected page(s) multiple select
more than one Web page or file to search. In Folder List view, press
the control key and left-click (CTRL+Left-click) on each file to
select it. Then open Find or Replace dialog to search only on the
selected files. Make sure you select Selected page(s) under Find
where: before doing a replace.
More information
For more information about
the Find and Replace, see Microsoft FrontPage 2002 Help.
#55. Use AutoFormat for Fast, Easy Tables
In
Microsoft FrontPage• version 2002, Table AutoFormat helps you
quickly create professional looking tables on your web pages. Create
a table and then use the AutoFormat feature to select a style you
want to use. Applying the style automatically changes your table•s
size, font properties, borders, shading, and colors.
To use Table AutoFormat, open a new page and create a new table
or open a page with an existing table in FrontPage 2002, and do the
following:
- Click on the table while editing it in Page view.
- In the Table menu, select Table AutoFormat.
- In Formats:, select from the list of 33 table format designs
to create the look you want.
- To further customize the table format, select options under
Formats to apply and Apply special formats.
- Click OK.
Tip: Two other new table-editing features in the
Table menu of FrontPage 2002 are Table Fill and Split Table.
- You can easily repeat the contents of an individual cell by
clicking on the cell to copy, then selecting that cell and
adjacent cells to copy to by dragging the cursor over them. Go to
the Table menu and select Fill, then Right or Fill, and then Down.
- Split Table allows you to divide a table at any location to
quickly and easily add text or graphics in between rows in a
table. Just click the table row you want to be the first row of
the second table, go to the Table menu and select Split
Table.
More information
For more information about
using new table editing features such as AutoFormat, see Microsoft
FrontPage 2002 Help.
A special thanks to Microsoft for this exclusive preview of
FrontPage 2002!
--Paul Thurrott
May
29, 2001
|