Windows XP Tips 'n' Tricks
Make Windows XP work the way you want it to!
These tips work
with the final release of Windows XP. Unless otherwise
noted, all tips should work with both Home and
Professional Editions.
Please note that some of these tips may require you
to use a Registry Editor (regedit.exe), which could render your
system unusable. Thus, none of these tips are supported in any way:
Use them at your own risk. Also note that most of these tips will
require you to be logged on with Administrative rights.
NEW!
Microsoft recently sent along a set
of Windows Tips that
might also be of interest.
Here's a movie of this tip in action 335 Kbps Windows Media Video format, 404K
Delete files when the Recycle Bin is hidden
NEW!
I actually discovered
this tip accidentally recently and thought it was
appropriate for the Tips page, even though it's probably
been a feature of Windows for years. (UPDATE: Sure enough,
it's been around for a while. It's still a cool tip and proof that
one learns something every day).
By default, the Windows
XP Recycle Bin sits at the bottom right of the desktop,
just above the tray notification area and system clock.
If you've got a bunch of floating windows open, however,
it's possible to obscure the Recycle Bin and make it
impossible to drag files and folders there for deletion.
However, Microsoft must have thought of this event,
because you can automatically hide all of those open
windows during a drag operation. The first time it
happened, I thought it was a fluke. But it's not.
Instead, it's a cool hidden feature of XP.
Here's how
it works: Make sure a bunch of windows are open on the
screen, with at least one of them hiding the Recycle
Bin. Then, find a file or group of files you'd like to
drag to the Recycle Bin. Pick up the files with the
mouse and move them to the lower right of the screen. As
you reach the bottom area of the screen, pass the mouse
cursor over a blank area of the task bar, hover there
for an instant, and--voila!--the
open windows all minimize, leaving the Recycle Bin
available to accept the dragged files. Good stuff. This
tip also works when windows are maximized, assuming the
file(s) you want to delete are visible in one of the
available windows.
Dramatically speed up Windows XP networking
(Professional Edition only)
NEW!
For some reason, both the
Windows XP Professional ships with a new networking
service called Quality of Service (QoS) enabled
by default, even though this service is only of use in
large corporate networks. At home, and in smaller
offices, QoS is best left disabled, however, and doing
so will speed up networking operations up to 20 percent.
Confusingly, turning off QoS in Networking Properties
will not actually free up the lost bandwidth. Instead,
you must load up the Local Group Policy Editor (see the
tip Use the ultimate configuration tool, below,
for more information) and tweak some settings to get QoS
out of your system for good.
Here's how
you do it. Open the Start Menu and choose Run, then type
gpedit.msc in the text box and hit ENTER.
This will load the Local Group Policy Editor (LGPE).
Once the LGPE is loaded, expand the following nodes in
the left tree view:
Then, select
the QoS Packet Scheduler entry and double-click
the setting titled
limit reservable bandwidth, found on the right
side of the window. On the Setting tab of the
Limit reservable bandwidth Properties dialog, select
the Enabled option. Then enter 0 in the
Bandwidth limit (%) combo-box. Click OK, then exit
the LGPE. No reboot is required to enable this change.
Note: If you look at the properties dialog for your
network connection(s), you should still see the QoS
Packet Scheduler listed on the General tab. If this item
is not present, QoS is still taking up 20 percent of
your bandwith! You need the packet scheduler installed
to ensure that no bandwidth is allocated.
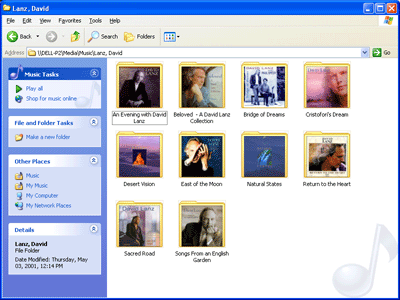
Add
album art to any music folder
Contributed by Richard Davidson and Brian
Donovan This is easily my favorite tip! One of the coolest new features in
Windows XP is its album thumbnail generator, which automatically
places the appropriate album cover art on the folder to which you
are copying music (generally in WMA format). But what about those
people that have already copied their CDs to the hard drive using
MP3 format? You can download album cover art from sites such as cdnow.com or amguide.com, and then
use the new Windows XP folder
customize feature to display the proper image for each folder. But
this takes time--you have to manually edit the folder properties for
every single folder--and you will lose customizations if you have to
reinstall the OS. There's an excellent fix, however.
When you
download the album cover art from the Web, just save the images as
folder.jpg each time and place them in the appropriate folder. Then,
Windows XP will automatically use that image as the thumbnail for
that folder and, best of all, will use that image in Media
Player for Windows XP (MPXP) if you choose to display album cover
art instead of a visualization. And the folder customization is
automatic, so it survives an OS reinstallation as well.
Your music folders never looked so good!
Album cover art makes music folder thumbnails
look better than ever!
UPDATE: In addition
to the folder.jpg file mentioned above, you can also optionally
create a smaller version of the image called albumartsmall.jpg, if
desired.